ESSENTIALS 2.0
There are a few more key techniques that we need to cover in the After Effects workflow. Hopefully, you are starting to see what the program can do and how it works. If you find yourself getting tripped up, it may be helpful to review the Week 7 blog post on After Effects basics.
Manipulating Layers
One very basic action that we haven’t covered yet is the editing of a layer’s in and out-points. By default, the entire length of a piece of media is dragged down into a composition and you may have noticed that there is no razor blade tool in the After Effects toolbar. Instead, to trim the beginning of a layer, move the playhead to the desired in-point and hit option [. Option ] will set the end point. (Use alt on a PC.) You can also click and drag on the ends of layers in a composition.
If you don’t hold down option, the [ and ] keys will move the layer without trimming it. [ will move a layer so that its in-point is at the playhead location. ] will move a layer so that it’s out-point is at the playhead. These shortcuts allow you to adjust the length and position of layers in the timeline very quickly, once you’re accustomed to using them.
When you’re moving or trimming layers, it’s obviously important to have your playhead exactly where you want it in the timeline. You can use the spacebar to play or move the playhead by clicking and dragging it with the mouse. For precision, you can use page up and page down to move frame-by-frame forwards and backwards. This is different from Premiere, which utilizes the arrow keys to move the playhead; in After Effects, the arrow keys adjust the position of the highlighted layer. If you hold shift and press page up or page down, you will move the playhead ten frames instead of one.
You will also probably need to duplicate layers fairly often in After Effects. This can be done by copy/pasting, but you can also use the command D keyboard shortcut. You can actually use command D to duplicate all sorts of things in After Effects: shapes, text, entire compositions, and even effects.
One last note about layers: if you double click on a layer in the timeline, it will open that layer in a panel over the composition preview window. This is actually not where you usually want to work, so if you accidentally double click on something, close the layer panel or click back to the composition preview window.
Easing Keyframes
The ability to keyframe and animate properties is probably After Effects’ most powerful feature; however, that animation may look a little stiff and unnatural at first. For example, if you use two “normal” keyframes to move a shape across a composition, the shape will begin moving abruptly, travel at a constant speed, and then stop abruptly. Sometimes, this is the desired effect, but it’s not how things usually move in the real world. Fortunately, After Effects makes it simple to make animation more natural and dynamic.

By default, keyframes in the timeline are diamond-shaped. This is a standard “linear” keyframe. If you right-click on a keyframe and move down to the “Keyframe Assistant,” you’ll see three “Easy Ease” options: Easy Ease, Easy Ease In, and Easy Ease Out. Easy Ease Out “eases out” a property, meaning it will start slowly and then build up speed. Easy Ease In “eases in” a property, meaning it starts fast and then slows down. Easy Ease is used for keyframes where you want a property to start fast, slow down, then pick up speed again. When you choose one of these options, the shape of the keyframe will change: Easy Ease Out is an arrow pointing left, Easy Ease In is an arrow pointing right, and Easy Ease is basically the other two icons combined.

Easy Ease sounds complicated, but it should quickly make sense once you start playing with it. It’s really an essential tool in After Effects; it makes animated properties – especially movement – seem much more natural. If you’re having a hard time with it, my general rule is this: use Easy Ease Out on the first keyframe in an animation, Easy Ease In on the last keyframe, and Easy Ease on the keyframes in between.
If you want to switch back to a standard linear keyframe, you can command click on it and its shape will change. If it turns into a circular shape, command click on it again, until it’s back to a diamond.

Transfer Modes and Track Mattes
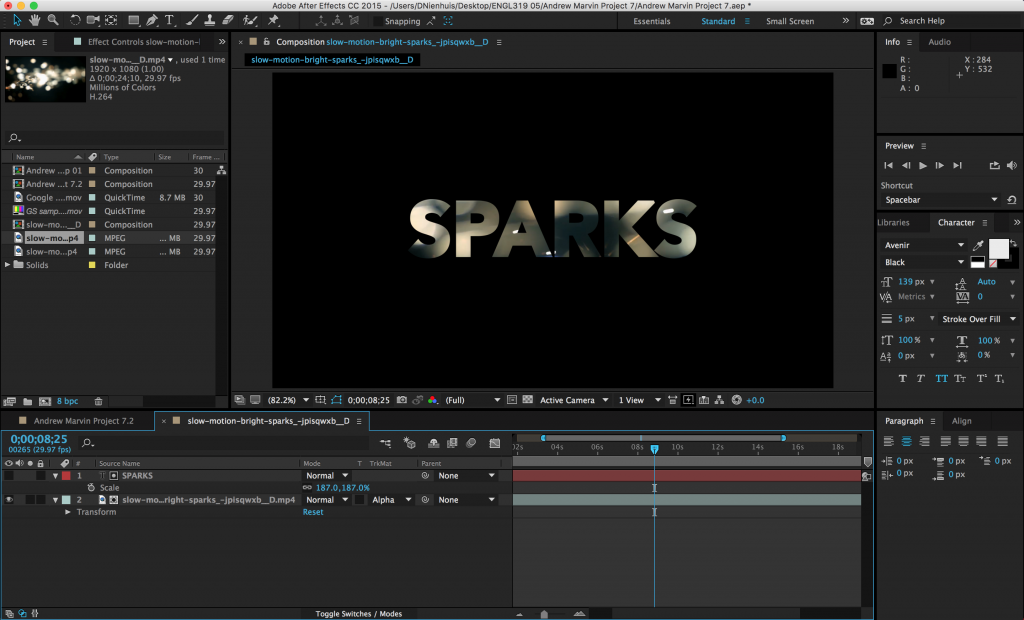
Those of you with Photoshop experience may be familiar with transfer modes. A layer’s transfer mode affects the way it interacts with the layers below it. There is a “Mode” section of the composition panel where this can be adjusted. You may need to hit the “Toggle Switches/Modes” button at the bottom of the panel for it to become visible.
By default, the transfer mode should be set to “Normal.” There are too many options to go through individually, but they are grouped together into sections. The section with “Darken” at the top uses the dark areas of the layer to affect what is visible; the section with “Add” at the top uses the light areas. You should experiment with the transfer modes to see how layers affect each other – you can get some really interesting results with them.
Next to the transfer modes are options for “Track Mattes.” A track matte tells a layer to look at the layer above it for certain properties. The “Alpha Matte” and “Alpha Inverted Matte” are particularly useful. For example, if you put a text layer above a video layer and then set the track matte of the video to Alpha Matte, the video layer will have the shape of the text layer. Alpha Inverted Matte will cut out the shape of the text.

Project 6: Thirds and Titles
Part 1
One thing that After Effects is often used for is the creation of “lower third” graphics. A lower third is a graphic (usually located in the bottom third of the frame) that contains text information about the subject of the video. Lower thirds are most often used in interview and documentary footage where the viewer needs to know the name and/or other information of whoever is on screen.
This week, we’ll be creating a lower third graphic. Download one of the videos above and create a lower third for that person. Here are the parameters:
- The lower third should be on screen for between five and ten seconds.
- The graphic should animate on to and off of the screen. This can be done using opacity, movement, or anything else you like.
- There should be two lines of text: one of your subject’s name and one of their job or title. Make something up!
- Put an easy ease on at least one of your keyframes.
If you need some footage to use as a base for your lower thirds graphics, here are some slow motion clips. You are also free to find footage or still images on your own. Render the video at 1920 x 1080 resolution using the H.264 codec and send me a download link!
Part 2
If you did not use After Effects to create a title graphic for your midterm project, I’d like you to create a title graphic for this assignment in addition to a lower third. Use the slow motion footage as the base to create a title graphic for an imagined project.
- The composition should be between 10 and 20 seconds long.
- Since this is a title graphic, some text should be used.
- Use at least one effect.
- Keyframe at least one property or effect.
Audio is not required, but you may certainly add some. Render the title graphic using the same parameters as the lower third and send me a link. If you already used After Effects to create a title graphic for your midterm, you do not need to do part two of the assignment!


