Categories
Weekly Lessons

Week 13: Expressions

EXPRESS YOURSELF

By now, you should be very comfortable keyframing properties in After Effects.  However, there is another way of animating in After Effects that doesn’t involve keyframes at all – using expressions.

Coding Animation

An expression is essentially a line of simple code that is applied to an animatable property.  It’s not the same as writing computer code – you don’t need to know any specific programming language, or anything like that – but the idea is similar.  To add an expression to a property, alt-click on the stopwatch icon that you usually use to turn keyframes on and off.  The value associated with that property will turn red and a box of text will open in the timeline window.  That window is where you add the expression.
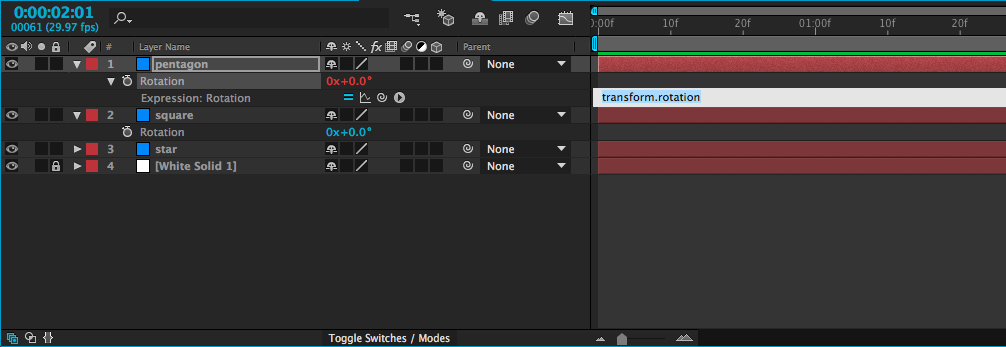
screen-shot-2016-11-15-at-2-10-23-pm

Probably the simplest kind of expression – and one of the most useful – adopts the value of a property on another layer.  For example, you could take the rotation value of one shape and apply it to the rotation of another shape.  When you create an expression, four small icons will appear, one of which is the swirly “pick-whip” icon that we previously used to parent layers.  If you use the pick-whip to select the rotation property on a different layer and then hit “enter” on the keyboard, whatever value is entered for that layer will be used for the layer with the expression.
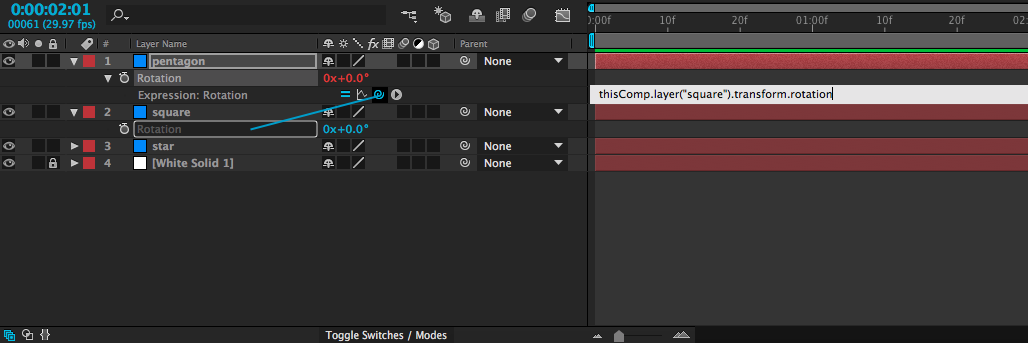
screen-shot-2016-11-15-at-2-17-33-pm

I realize that probably sound confusing, but it’s fairly simple in practice.  It means that you can animate a single layer and use it to affect other layers.  Simply animate the first layer, then use an expression on the others.  Try it out – once you get used to the process, you might find yourself using this particular expression a lot.

Incidentally, if you want to remove an expression, alt-click on the stopwatch icon again and it will return to normal.

giphy

Math

One thing that’s neat about expressions is that they can be easily combined or modified.  If, for example, you wanted to use the rotation expression above, but make the layer with the expression rotate the opposite way of the layer it gets linked to, that’s very simple.  Just use the pick-whip to select the layer with animation, then type *-1 (multiply by negative one) after the expression in the text box and hit “enter.”screen-shot-2016-11-15-at-2-38-05-pm

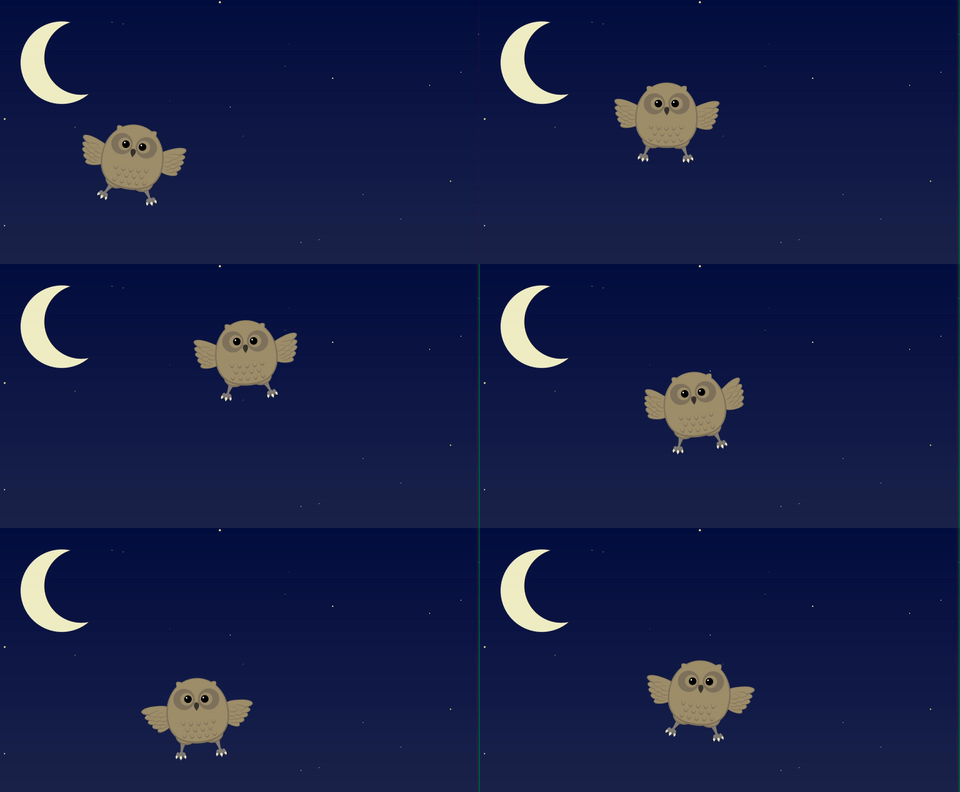
This technique can be very helpful for things like animating walk cycles (where both arms and legs will swing simultaneously, but in the opposite direction), or making a bird flap its wings.  You can animate both wings with one set of keyframes.  Furthermore, any changes you make to that set of keyframes will automatically affect both layers.

giphy-1

There are a lot more expressions that you can use to automate all sorts of properties in many different ways.  One that you might come across uses the timecode of the composition, often multiplied by a number.  If you add an expression to the rotation property of a layer and type time, the layer will rotate to one degree at the one second mark, two degrees at the two second mark, etc..  If you type time*100, it will rotate to 100 degrees at the one second mark, 200 degrees at the two second mark, etc..  This is a simple way to add continuous animation to a property, regardless of the length of the composition.

Get Random

I’ve been using rotation in my examples so far, because it’s an easy property to visualize.  Anything that can be keyframed can be affected by an expression, though – opacity, position, scale, and even the individual parameters of effects.  One of my favorite expressions, wiggle, applies random values within certain limits.   It can be used, among other things, to create unpredictable, organic-seeming movement when applied to the position of a layer.

To add wiggle to the position of a layer, alt-click on the Position keyframe icon in the Transform properties.  A text box will open in the timeline – in it, type wiggle, then two numbers in parentheses, separated by a comma.  For example: wiggle(2,150).  The first number in this expression is the frequency: 2 equates to two times per second.  Entering a 3 would be three times per second, and entering .5 would be half a time per second (or once every two seconds).  The second number is the amount to move.  So, our position expression “wiggle(2,150)” will move an object up to 150 pixels along the X and Y axis, twice per second.  If our layer were 3D, it would move on the Z axis as well.

screen-shot-2016-11-15-at-3-20-15-pm

Of course, you don’t always want random movement, but it’s occasionally extremely helpful.  I’ve used the wiggle expression to animate everything from fireflies to dials on a dashboard.  You can even apply a wiggle to a virtual camera to simulate the look of handheld footage.  Randomness is more powerful than you might initially realize.

giphy-2

Endless Possibilities

Expressions open up a vast new world of possibilities in After Effects.  The icon to the right of the pick-whip opens a window that contains dozens of “building blocks” – presets and pieces of expressions that can be combined to make very complex automated effects.  Don’t feel like you need to understand what each of these does – instead, just get comfortable applying expressions.  Often, online tutorials and trainings will provide expressions for you to copy and past into your own compositions.  Like so much of After Effects, once you are familiar with the process, you can figure out the specifics as you go.
giphy

Categories
Projects

Project 10: Lights and Shadows

https://youtu.be/KI-Mi3CqkBE

https://youtu.be/fc02CXvdwtU

https://youtu.be/Q9vXUMJE8gw

https://youtu.be/318i_u0qn-Y

Categories
Blog Posts

Spheres and Cubes

3D SHAPES

As I previously mentioned, After Effects can be used to place 2D layers in 3D space, but it can’t be used for advanced 3D modeling.  We can, however, create or simulate simple 3D shapes such as cubes and spheres.

Cubes and Boxes

Making a 3D cube in After Effects is quite simple, although the process can be a bit tedious.  Construct your shape using solids – when you create a new solid, you can specify the size, so you can create a cube fairly quickly by creating six square solids (one for each side of the cube).  Switch the layers to 3D and adjust the orientation (or rotation) and position of each side so that they line up.  If, for example, you want to create a cube with sides that are 500 pixels, each side needs to be 500 pixels away from its opposite side.

You can make this process more streamlined by actually doing simple math within the timeline.  If your layer needs to move forward by 250 pixels, you can click on number you want to change and type “+250” after it.

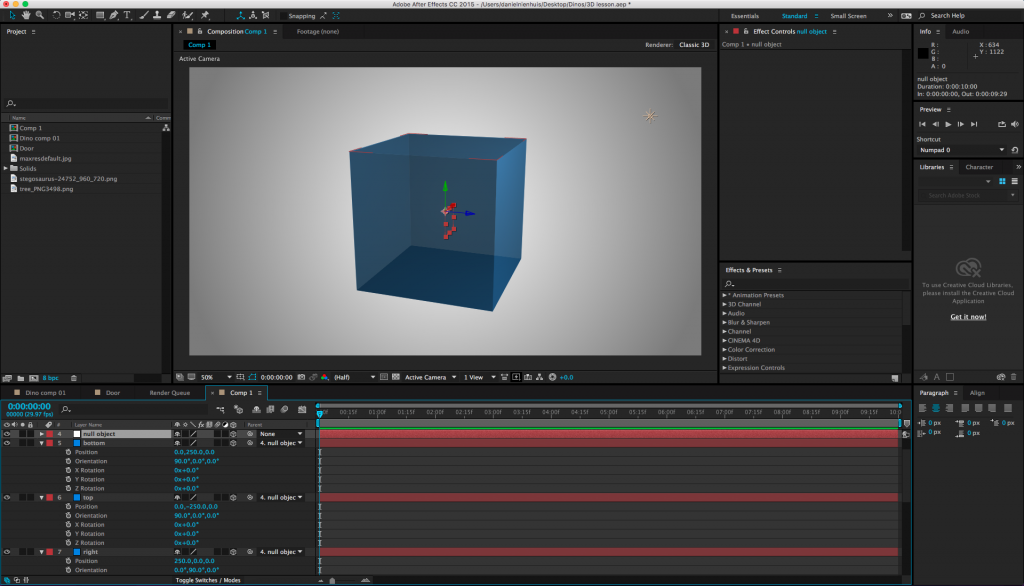
Once you have your cube or box created, you may want to move it around your scene.  You can do this by parenting the sides to a 3D null object.  Create a null (from the top menu, Layer>New>Null Object) and turn on its 3D property in the timeline window.  Then parent each of the sides to the null object and use it to position your cube in 3D space.  You can play with the opacity and color of the sides and/or add virtual lights to give the shape some definition.

screen-shot-2016-11-10-at-2-12-10-pm

Spheres

We can’t create spheres in the same way that we create cubes, but we can create a shape that appears to be a sphere.  Using either a solid or an image (or even a video) as a base layer, choose “CC Sphere” from the “Perspective” category of the effects.  This effect will make any layer look like a sphere, complete with parameters to adjust the lighting and shading.  It will still be a flat 2D layer, though, so if you add a 3D camera move, your sphere will look like a disc instead.

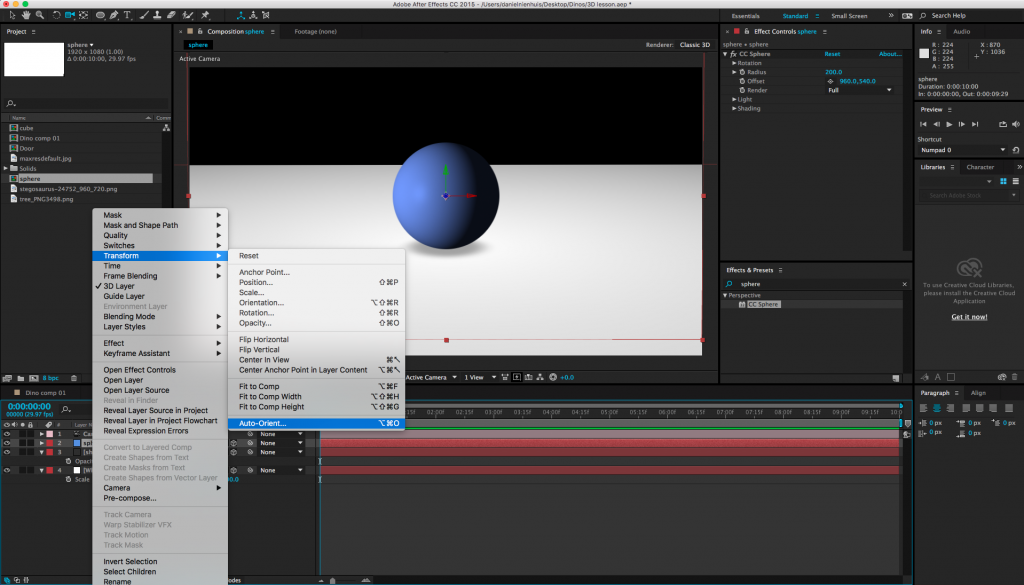
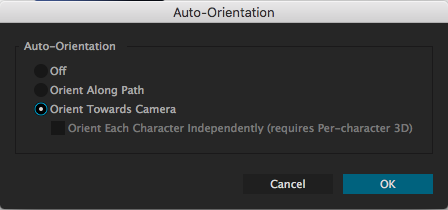
There is a way around this, though.  First, set the sphere layer to 3D.  Then right-click on the layer and choose Transform>Auto-Orient…, which will bring up a menu with a few options.  Choose “Orient Towards Camera” – this will make the layer face the active camera, regardless of where it is.  Since spheres look the same from every angle, your flat disc will appear to be 3D.

screen-shot-2016-11-10-at-2-24-55-pm

screen-shot-2016-11-10-at-2-25-10-pm

Remember that since your sphere is still technically a disc, virtual lights won’t affect it the way you might want them to.  However, you can fake many of the same effects (shadows, reflections, etc.).  For example, you can create a simple feathered shape to give the appearance of a shadow.

You can take this technique much further to create glowing orbs or planets or other complex spherical shapes.  If you want to really get crazy, check out this tutorial on Video Copilot.  Some things may be unfamiliar, but you should be able to follow along.  There are tons of  other great tutorials on Video Copilot as well, so check that site out if you want to hone your skills.

Categories
Weekly Lessons

Week 12: Lights, Shadows, Action!

LIGHT AND DARK

Last week, we began exploring the wild, wonderful world of 3D in After Effects.  This week, we’ll take things a little further by incorporating virtual lights into our compositions.  This week’s lesson will really build on the previous one, so you may want to look things over again if you aren’t feeling confident.

Four Kinds of Light

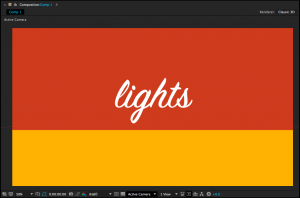
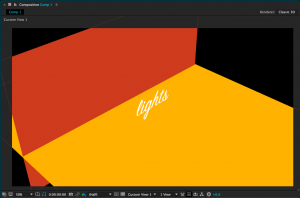
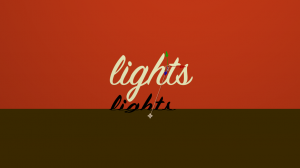
As we previously discussed, adding a virtual camera to a 3D scene in After Effects can give an entirely new dynamic quality to your compositions.  Virtual lights can have a similar effect.  The following simple scene is composed of four 3D layers: a red background “wall” layer, a yellow “floor” layer, a text layer, and a camera.  If you were to just glance at the composition, though, you wouldn’t know the scene was 3D at all – you have to switch to one of the “Custom Views” to see how things are arranged.

screen-shot-2016-11-08-at-2-39-44-pmscreen-shot-2016-11-08-at-2-40-04-pm

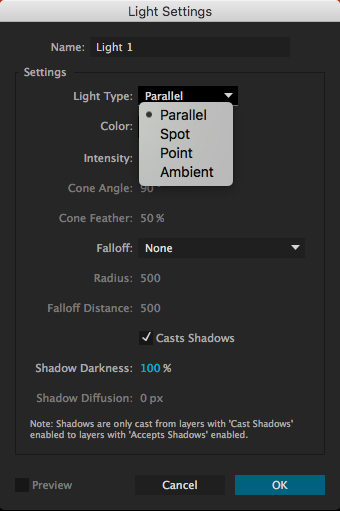
We can make this scene more interesting by adding lights.  Lights are created in the same way as virtual cameras and other kinds of layers: from the top menu, choose Layer>New> and then choose Light….  A menu will appear with several options, the most important of which is “Light Type.”  The kind of light you create will completely change how it affects the scene.  For each type of light, you can define the color and intensity.  Additional parameters will be available depending on which kind of light is selected.

screen-shot-2016-11-08-at-3-42-03-pm

screen-shot-2016-11-08-at-3-48-18-pm
Parallel Light

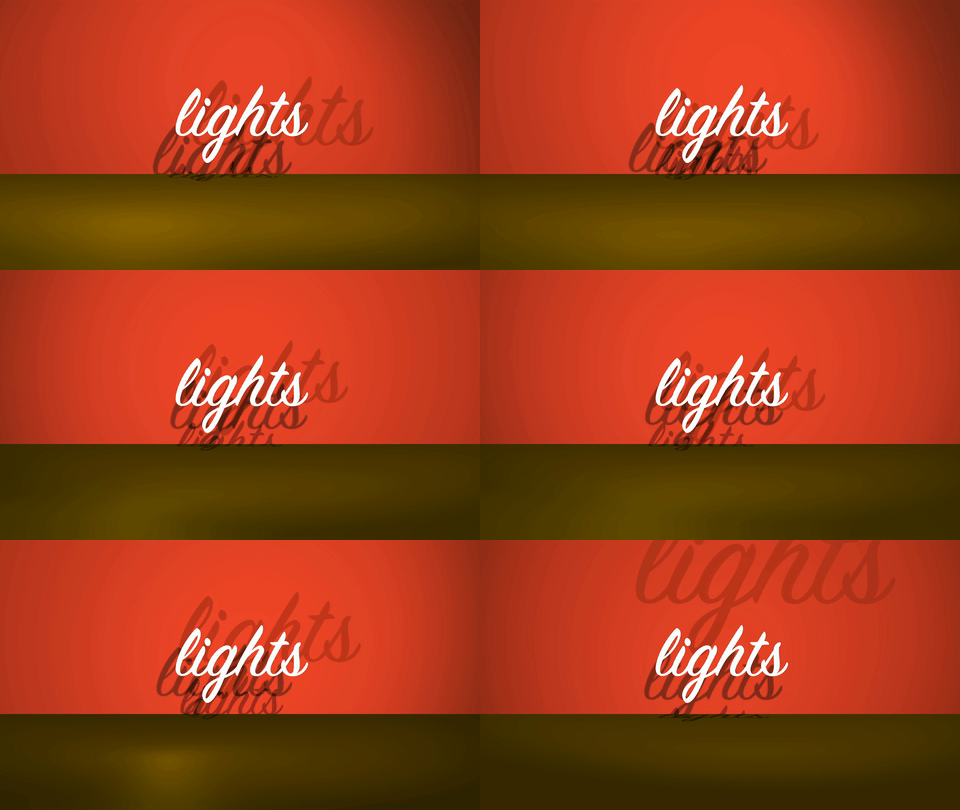
Parallel:  These are rays of light cast in a certain direction.  Parallel lights behave similarly to outdoor sunlight and can cast shadows.  By default, parallel lights do not “fall off”, so it does not matter how close or far they are from the things they illuminate.  Changing the Point of Interest on a parallel light will change the direction it casts light in.


screen-shot-2016-11-09-at-1-35-28-pm
Spot Light

Spot:  This is a cone of light that is brightest in the center, then fades to darkness.  You can adjust the angle and “feather” of the cone and spot lights can cast shadows.  Spot lights have the most potential parameters to adjust – in addition to the light’s position, you can change its point of interest, orientation, and rotation on the X, Y, and Z axis.


screen-shot-2016-11-09-at-1-42-22-pm
Point Light

Point:  This is light emanating in all directions from a point in space.  Like all light types, the point light itself is invisible – there is no glowing orb where the light is located, only its effects are visible.  Point lights can cast shadows and are brightest close to the location of the light.


screen-shot-2016-11-09-at-1-48-06-pm
Ambient Light

Ambient:  This is light emanating from everywhere at equal intensity.  Because light is coming from all directions, ambient lights cannot be used to cast shadows.  Ambient lights are helpful when used in addition to other types of light, since they can change the illumination level and color of a composition uniformly.

Casting Shadows and Material Options

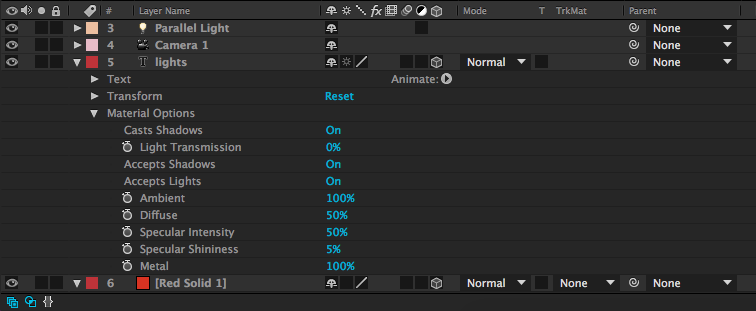
When you create a new parallel, spot, or point light, you will have the option to check a box that says “Casts Shadows.”  However, you will also need to tell After Effects which layers in the composition are affected by the light’s ability to cast shadows.  By default, every 3D layer can receive shadows (a shadow will show up on that layer when it is cast by another layer) but not cast shadows.

To change this and make your layers actually cast shadows, you’ll need to look at the “Material Options” for the layer.  These are found below the “Transform” properties in the timeline window.  The first option is “Casts Shadows.”  In the same category are options for “Accepts Shadows” and “Accepts Lights,” both of which are “On” by default and both of which you can probably leave that way – unless you specifically want a layer to not be affected by the lights in your scene.

screen-shot-2016-11-09-at-2-05-18-pm

There are other areas you can adjust in the Material Options – shininess, diffusion, and more.  While these parameters can be fun to play with, don’t be surprised if they don’t make a dramatic difference; many of these properties (like “Specular Intensity”) are most apparent on curved surfaces – and 3D layers in After Effects are flat.  I generally don’t do much with the Material Options besides enable or disable shadows.

Illuminate Things!

Now that you know what the different kinds of lights can do, use them creatively to add an extra layer of interest to your compositions.  Remember that almost every parameter – color, intensity, position, point of interest, etc. – can be keyframed.  Also remember that lights, like cameras, only affect 3D layers in After Effects; nothing will show up until you click on that little 3D box icon for the layer in the timeline window.  Have fun!

lights-giphy

Categories
Projects

Project 9: Hidden Depth

https://youtu.be/B-DxQxJbKZE

https://youtu.be/3zFTuBZ_Hlw

https://youtu.be/91e8q9gdCaw