TAKING GRAPHICS TO THE NEXT LEVEL
Last week, we briefly discussed the general workflow and usage of After Effects. While After Effects is an incredibly versatile program, it is really designed around the creation of motion graphics. We were able to do some simple graphics work in Premiere using the Title tool, but After Effects allows us to do much more in a more intuitive interface.
Transform Properties and Effects
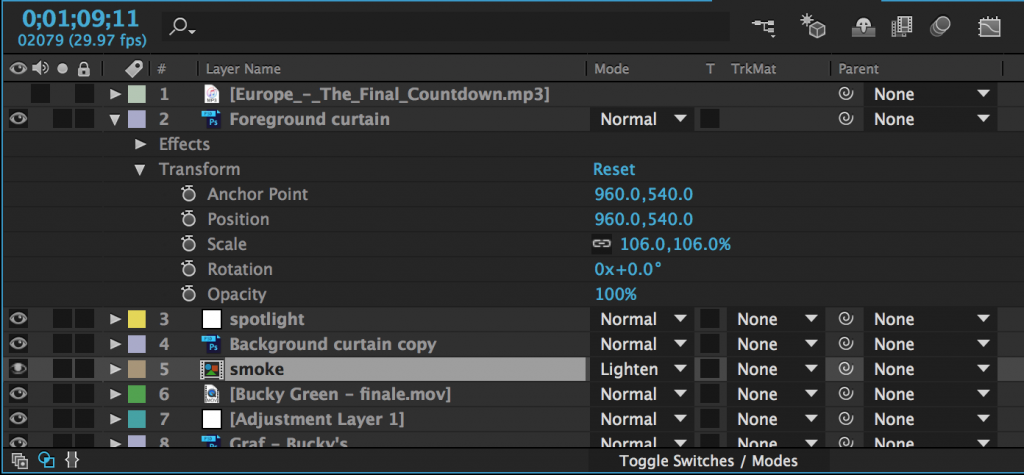
In Premiere, there were a few things that could be adjusted directly within the timeline, but most properties had to be modified using the Effect Controls panel. After Effects has an Effect Controls panel as well, but it is only used to control effects. The timeline, on the other hand, allows you to modify much more. On the left side of each piece of media (or layer) is an arrow that can be tipped down. Clicking it will reveal three categories of properties that can be adjusted: masks (if any have been added), effects (if any have been added), and a section called “Transform.” These categories always appear – and are applied – in this specific order: first, masks are applied, then effects, then transform properties. If your media includes audio, that section will appear last.

Clicking “Transform” will reveal a lot of the same properties that appeared at the top of the Effect Controls panel in Premiere: anchor point, position, scale, rotation, and opacity. Most of these are self-explanatory, although “anchor point” can be a little confusing. The anchor point is basically the central point in an image or video and changing the anchor point changes the way an object rotates and scales.
You will be adjusting the transform properties a lot when using After Effects, so it’s helpful to know their keyboard shortcuts:
A – anchor point
P – position
S – scale
R – rotation
T – opacity
You’ll notice that next to every transform property – in fact, next to almost everything – is the same keyframe switch we used in Premiere. By default, keyframes are switched off (the stopwatch icon is greyed-out). Clicking the icon will turn keyframes on and a new keyframe will be set every time an adjustment is made to that property.
There are many effects built in to After Effects and countless more that can be added using plugins. The effects are organized into categories under the Effects dropdown and in the Effects panel, which has a useful search bar. Clicking on a piece of media in a composition and then choosing an effect in either location will add that effect and should bring up the Effect Controls panel. The effect will also appear in the layer information of the composition in the timeline.
Whenever you add a keyframe to an effect or transform property, that keyframe will appear as a diamond shape on the timeline. Keyframes can be moved, copied and pasted, or deleted right on the timeline. A group of keyframes can be scaled up or down by selecting them with the mouse, then holding alt while clicking and dragging a keyframe at the end of the group. You may need to experiment to see just how this works, but After Effects is designed to make adding and modifying keyframes very easy. As a result, you can animate properties with very precise control.
To see all the keyframes on a layer, highlight that layer in the timeline and press the U key. I use this particular shortcut constantly.
Masks
As I previously mentioned, most of the media you add to your composition will have three kinds of properties: masks, effects, and transform properties. Transform properties and effects will probably be familiar from Premiere, but masks are somewhat unique. You’ll find the mask tools up at the top of the screen in the tool bar. There are preset mask shapes (hold-click to see the various options) and a pen tool for custom shapes. Be sure to select the layer you want to mask in the timeline panel before clicking on a mask tool.

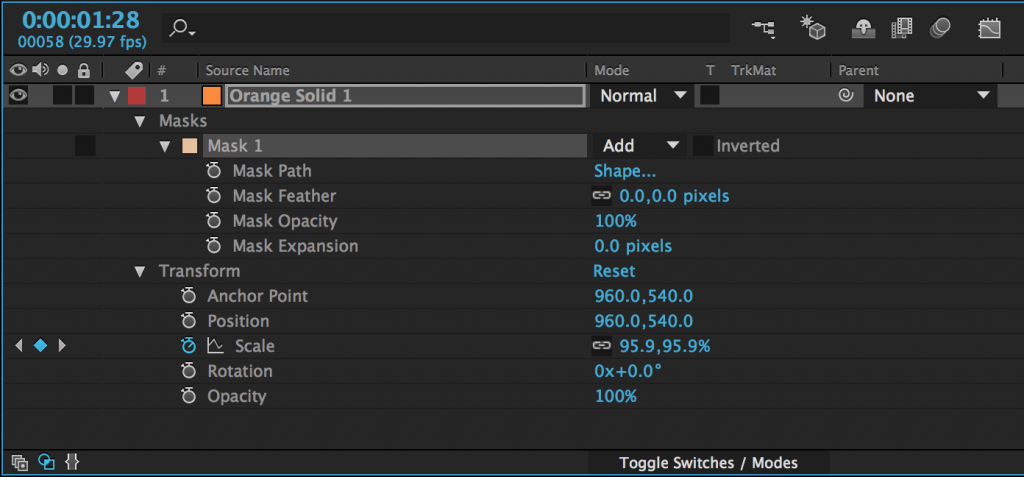
After you add a mask to an object (with either a shape tool or the pen tool), it will appear as a property of that layer in the timeline panel. Next to the name of the mask, you’ll find a dropdown menu – the default value should be “Add.” This means that the mask is “adding” that area and discarding everything else. If you change this to “Subtract,” the area of the mask will be taken away and everything else will remain. Choosing “None” will make the mask have no effect. There are several other options as well, but add and subtract masks are what you will use most of the time.
There are a number of options for further modifying the mask, which are available by clicking the triangle to the left of the mask’s name. Mask Path allows you to keyframe the mask’s shape (we’ll discuss this further in another session); Feather fades the edges; Opacity changes the transparency; and Expansion allows you to grow or shrink the mask.

Solids and Text
In addition to media that you import, you can create layers to add to your composition from within After Effects. The most common are solids and text layers. To create one, go to the Layers dropdown menu at the top of the screen, select New, and choose Solid or Text. When you create a new solid, you’ll see a menu with options for name, size, and color.
Unlike Premiere, which opens up a new panel for text creation, the controls for text layers are broken down into panels in After Effects. The Character panel modifies the font, color, size, kerning, and more; and the Paragraph panel modifies the alignment.
You may be surprised at how often you use solids in After Effects. Their most obvious use is as a simple shape — in a motion graphic or title, for example. However, they are also a blank slate for adding other effects. You can use the effects in the “Generate” section to transform a solid into animated “radio waves,” or a checkerboard pattern, or a complex fractal. You can create a noise or static pattern using the “Noise & Grain” effects. You can quickly make snow or rain with the “Simulation” effects. Take some time to play around with solids in After Effects — they are, in a sense, the most basic building block in the program.
Exporting Using the Render Queue
Exporting your finished project in After Effects is a little more complicated than it is in Premiere. The best way to export in After Effects is using the Render Queue. The Render Queue exists as a panel in After Effects – it may show up as a tab next to the compositions in the timeline (otherwise, you can always find it under the Window dropdown at the top of the screen).

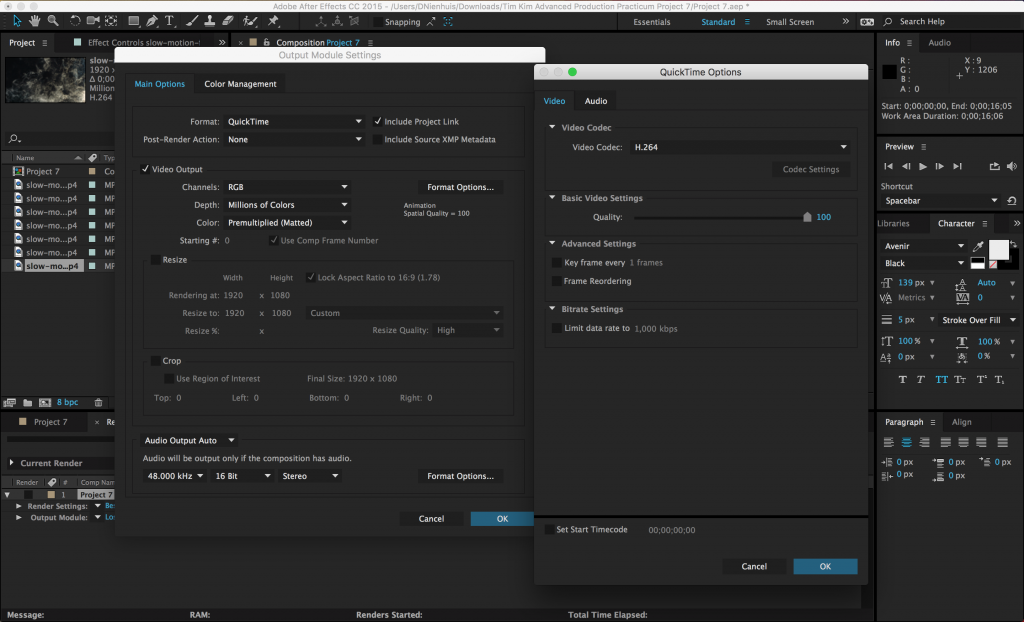
To add a composition to the Render Queue, open the composition in the timeline, then go to Composition>Add to Render Queue. The name of the composition should then appear in the Render Queue panel. Before you hit the “Render” button, you’ll need to set a few parameters. Unless something has been changed, everything in the Render Settings section should be fine at the default values. The Output Module is where you actually make changes to the file type and codec, so click on that to bring up a window with lots of options. For our purposes, just click on “Format Options…” and change the video codec to H.264. Click OK to close each window. Finally, set the file’s destination by clicking on the text next to “Output To:”.
What’s great about the Render Queue is that, if you are working on multiple compositions, you can add them all, then render them together. Just repeat the process of adding them to the queue and adjusting their settings, then hit Render.

Assignment 6 (Optional): Titling in After Effects
Since you all are finishing up your midterm projects, there is no required assignment over the break. However, if you would like to use After Effects to create a title graphic for your midterm project, that will count as a future assignment. In other words, you can do this assignment now, as part of the midterm, or later, as part of another project when we return from break.
If you decide to use After Effects in your midterm project, simply replace the title graphic you would have done in Premiere with one you make in After Effects. The title graphic should include the name of your chosen work and the original author. You may also include your own name, if you like. Feel free to play with properties, effects, masks, and solids – and you must use keyframes to animate at least one of these elements.
If you don’t want to get that far into After Effects just yet, that’s fine too – just be ready to hit the ground running when we return!
One reply on “Week 7: Introduction to Motion Graphics”
[…] can do and how it works. If you find yourself getting tripped up, it may be helpful to review the Week 7 blog post on After Effects […]