BEYOND BASIC EDITING
Once you have a solid grasp of the basic Premiere Pro workflow, you can incorporate increasingly advanced techniques into your work. Here are the areas that we didn’t get to cover in week two.
Text Titles
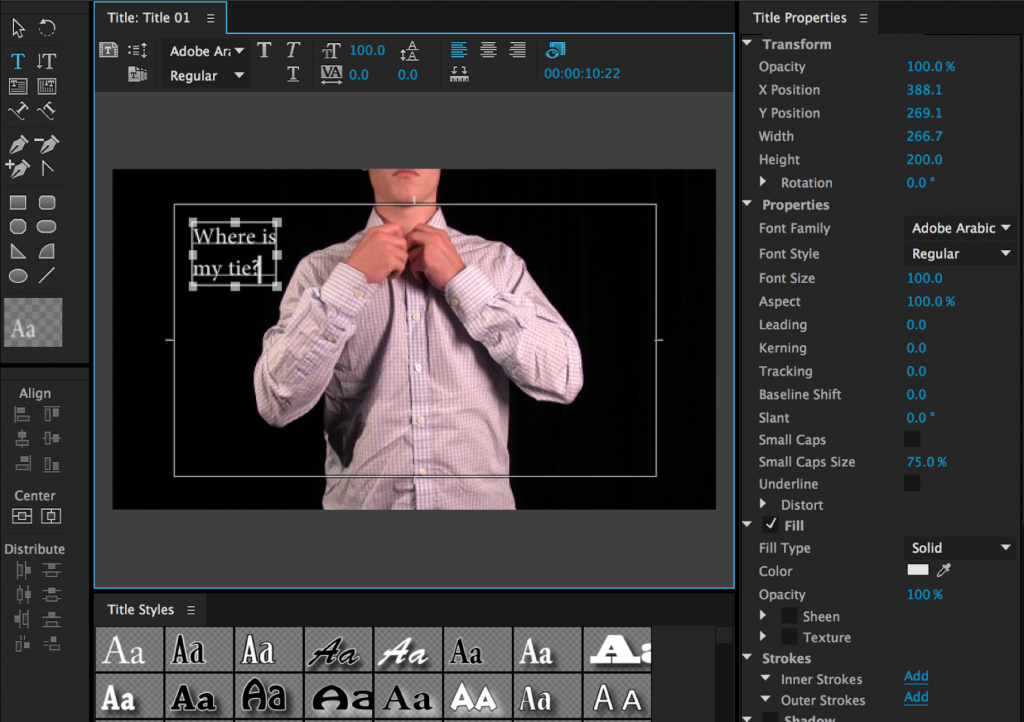
You can add text titles to your project by clicking the New Item icon in the Project Window and choosing Title. Clicking this will bring up options for the title’s name and format, but it will default to whatever the settings are in the currently open sequence. Clicking OK will bring up a new window with options for adding text and shapes. The video in the title window will be whatever the playhead is on in the Timeline. You can choose the text tool, click anywhere on the video, and type in a title. This can be moved and scaled, and fonts can be chosen from the drop-down menu at the top. You can adjust the fill, stroke, opacity, and drop shadow from the Title Properties on the right-hand side of the window. There are also useful alignment tools on the left-hand side, if you want to be sure your text is centered horizontally or vertically.
When your title looks the way you want it to, you can close the window. It’s important to note that titles are not added to the sequence automatically – instead, they show up in the Project Window. You can drag them into a sequence from there, then adjust their length by grabbing an end with the mouse and pulling them longer or shorter. Be sure to put your title on a track above your video – if it’s below, you won’t be able to see it.

Keyframes
Most things that appear in the Effect Controls window will have a small stopwatch icon to the left. Clicking this icon turns keyframes on and off. Keyframes mark a certain value at a certain time. If you set a scale keyframe of 100% at 00:00:05:00 (five seconds, zero frames on the timeline) and another scale keyframe of 150% at 00:00:15:00 (fifteen seconds, zero frames), the media will increase in scale by 50% over a period of ten seconds. You can use keyframes to animate various properties and effects. A slow animation on the scale of a piece of static footage can make the shot more visually engaging. Animating opacity (especially with one piece of footage over another in the timeline) can give unique, surreal results. I’d suggest being conservative with your use of techniques like these, but you should absolutely start playing with them and testing how they work. This is the type of editing that gives a finished piece a level of professional polish.
Be sure to take note of whether the keyframe “stopwatch” icon is blue or greyed-out. Most properties have keyframes turned off (grey) by default, but a few are turned on (blue) by default. If the icon is blue, making any change to that property will set a keyframe. If the icon is grey, you can still make changes to the property, but those changes will be static, not animated over time.
Moving from the Effect Controls to the Timeline, you can add keyframes directly to pieces of media using the pen tool (P). If you expand a video or audio track, you should see a thin line. On video tracks, this controls opacity; on audio tracks, it controls volume. Click on the lines with the pen tool to create keyframes, then drag them around to animate these properties. For all keyframeable properties, clicking the stopwatch icon again will erase all keyframes and clicking the circular arrow to the right will reset everything to its default value.
Adjustment Layers and Nesting
Adding effects to individual clips is fine, but there may be times when you want to apply the same effects to many clips at once. For example, if you edited a project, then decided you wanted everything to be in black and white. You could apply the “Tint” effect to each clip, or you could use an adjustment layer to affect everything. Adjustment layers look like blank pieces of video media. When you apply an effect to an adjustment layer, that effect will appear on everything below it on the Timeline sequence. For example, if we placed an adjustment layer on video track V3 and added the “Tint” effect, that effect would appear on the stills and video clips on tracks V1 and V2.
You can create an adjustment layer using the “New Item” icon in the window with all your project’s media — it looks like a square with a folded corner. An adjustment layer will appear in the list of media and you can drag it into the Timeline — just be sure not to accidentally overwrite any footage. (If you need to create more tracks in the sequence, right-click in the Timeline window and select “Add tracks,” or drag a piece of media to the blank area above the existing tracks.) Simply add effects to the adjustment layer as you would any other piece of media.
You can also combine multiple clips in the Timeline by “nesting” them together. Nesting essentially creates a sequence within a sequence. You will probably not need to nest footage very often, but it can be useful in certain situations. Highlight multiple pieces of media in a sequence, right-click, and choose “Nest.” You’ll be prompted to rename the new sequence, which I would suggest you do in order to avoid confusion later. The multiple clips will be replaced with what appears to be a single piece of media in the sequence. Effects can be added and properties can be keyframed like any other clip.