AUDIO MATTERS
Although it’s often under-appreciated, sound is just as important as visuals when it comes to creating compelling video. In fact, you could make the argument that sound quality is more important than having good-looking footage. As a viewer, you can adjust to footage that’s less-than-perfect; grainy, “vintage” visuals can be a stylistic choice, after all. You cannot ignore bad sound, though. Bad audio is always distracting – it’s probably the single biggest factor that keeps amateur work from seeming professional.
This class is focused on post-production, so we won’t spend much time going over what you need to do to capture good sound on set. The most important things are to use decent equipment, get the microphone as close to your subject as possible, monitor your levels constantly, and to take your time with it. Spending an extra twenty minutes on set setting up your audio effectively can save you hours when you get to the editing stage.
This week, we’ll look at two aspects of audio post-production: basic mixing/repair and sound design.
Mixing
When it comes to dialing in the levels of your audio media, you have two basic tools: the Track Mixer and the audio section of the Effect Controls. As we discussed in week two, it’s generally best to sort different kinds of audio onto different tracks. For example, you can place a voice over clip on one track, music on a second, and sound effects on a third. Of course, it’s not always possible to do this – you may need multiple tracks for overlapping sound effects, for example. If you’re fairly consistent, though, you can quickly make broad changes, such as lowering the maximum volume of all the music in your project, or raising the volume of all the in-camera audio.
The Audio Track Mixer will probably be hidden by default, so you may need to find it using the Window drop-down at the top of the screen (note that there is a “track” mixer and a “clip” mixer – we’ll be using the Track Mixer). There will be a volume slider for every audio track in your sequence, along with a master control on the far right. You can set a fixed volume adjustment or pan, as well as toggle the mute and solo from this panel.
Finer adjustments (and keyframed properties) can be made in the Effect Controls panel. Audio effects (found in the Effects panel) can be added and reordered and properties like volume and pan can be changed and/or keyframed. Note that the keyframe icon may be turned on by default on some properties, so be sure to switch it off if you are making an adjustment, but don’t want to animate the property.
You can also make volume adjustments to clips directly in the Timeline. If you expand an audio track to the point where you can see its waveform, you should see a fine white line in the middle of the track. Dragging this up and down will adjust the volume. You can also choose the pen tool and make keyframes on the line. These keyframes will appear in the Effect Controls. The pen tool is a great way to clip out problematic sections of audio or make detailed volume adjustments.
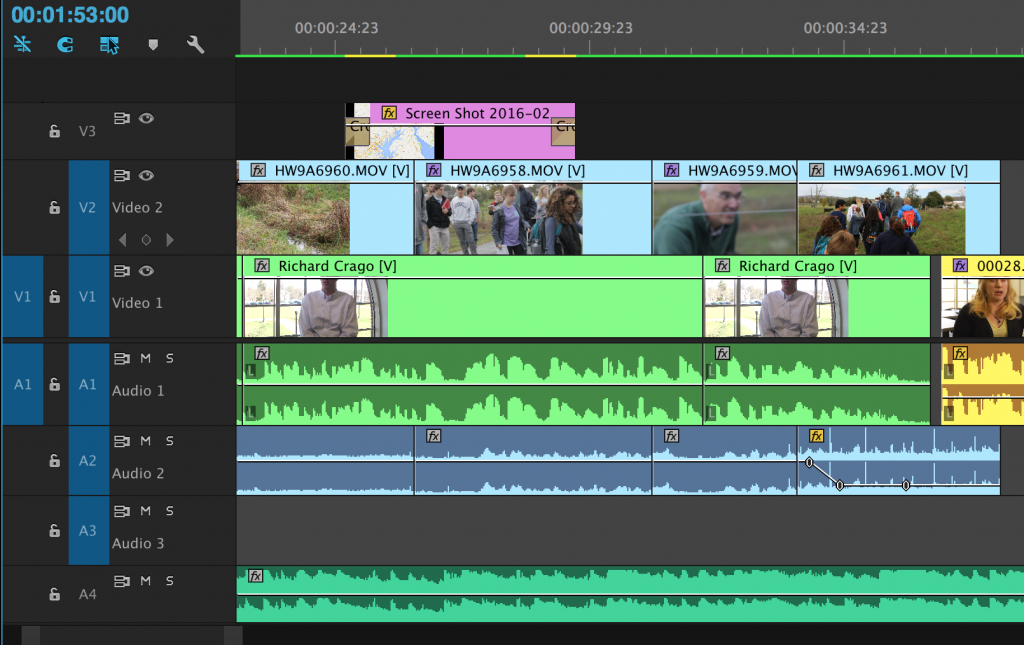
When it comes to actually mixing the audio in your project, there are a few things to keep in mind. First, you want to avoid having any of your audio peak, or blow out. As your project plays in the Timeline, the audio meters off to the right side will show the master volume. If this crosses over 0 dB, the top of the meter will turn red. Adjust the clip (or the entire track, using the Track Mixer) to avoid this. As a general rule, your master audio level should hit between -6 and -12 dB most of the time. Occasionally going higher or lower is fine, as long as you avoid peaking.
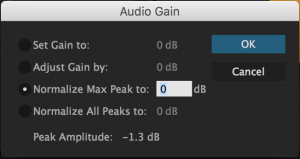 If you have an audio clip that was recorded too low or too high, you can also make an automated adjustment called “normalizing.” Right-click on a clip and select “Audio Gain…” – this will bring up a small menu with a few different options. You can either normalize the “max peak” or “all peaks” – the two work in similar ways, so you probably won’t see a huge difference between the two. Keep in mind that since this is an automated effect, you’ll want to pay close attention to how it changes your clip. You can also set or adjust the gain of a clip in this menu, if the volume controls in the Effect Controls window are insufficient.
You also want to avoid having any sections where there is a complete lack of sound in your project. Even during moments where no one is speaking and no music is playing, you want some base level of noise in your sequence. The almost-imperceptible ambient sound of a space is called room tone. Ideally, you should have recorded room tone at every location filmed at for your project. Of course, that’s often not the case, so you may need to either record or find something. Again, you just want to avoid complete silence; having all audio drop out is jarring and uncomfortable for the audience. That being said, it’s also a good idea to add a brief fade-in and fade-out to your audio at the beginning and end of your project.
Repairing poorly recorded audio in Premiere generally involves either removing unwanted sounds (such as tapping or rustling), filtering out persistent tones (such as static or hiss), or fine-tuning inconsistent levels. Clipping out unwanted sounds can be done using either the pen tool or the razor blade. You may need to “patch” some sound in using room tone. Filtering out background sounds can be done using filters in the Audio Effects folder. I’d recommend the “de-noiser” effect for removing unwanted hiss and the like. The best way to get a handle on these tools is to simply use them, so please experiment. Inconsistent levels can be fixed using either the pen tool or the volume property in the Effect Controls window.
Tracks and Channels
To make the layout as clean and accessible as possible, Premiere can actually display multiple channels of audio on a single track – for example, if you import a piece of video with stereo sound, both the left and right channel may be on the same track. This is generally fine, but sometimes, you may want to use only the left or right channel in your project. This is often the case when you record footage with an external microphone; the left channel might have the clean audio from the microphone, but the right channel might have the scratchy audio from the built-in microphone, or no audio at all.

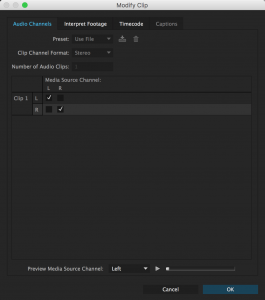
Fortunately, it’s simple to change the way audio channels behave in Premiere. Simply right-click on the audio channel of a clip and choose “Audio Channels.” A menu will open with check boxes for which channels you wish to use. If your good audio is on the left channel, simply select “L” under “Media Source Channel” for both of the clip’s channels. That sounds slightly confusing, but it’s quite simple in practice.
If you want to separate your audio track from the video track, you can right-click on the track and choose “Unlink.” This will allow you to slide either the audio or video around independently. You can also option-click on either the audio or video part of a clip to select only that aspect, then move or delete it.
Sound Design
It’s important to remember just how much sound can alter the feeling – or even the meaning – of footage. Music is the obvious example, since it can alter a scene’s tone so drastically, but it’s definitely not the only tool you have at your disposal. Sound effects (when used right) can draw attention to actions, or imply something happening off-screen. Using effects on audio can make things seem dreamy, or intense, or frightening. Using ambient tones beneath “normal” sounds can make a scene suddenly ominous.
In our day-to-day lives, we constantly being exposed to sounds that we tend to “tune out” automatically: a ticking clock, the hum of a heating system, the murmur of traffic. In video production, you are often starting from scratch, so it’s important to think about what needs to be included. You (generally) don’t want to overwhelm your audience with a wall of competing sounds, but you also (generally) don’t want your scene to feel stark and lifeless. I’d recommend starting with any dialog or voice over, then adding room tone, then thinking about sound effects. Remember that it’s okay to be subtle.
Adding music is usually the final step, at least for me. I’m generally looking for music that will enhance and amplify the scene I’m already building, without taking it over. Of course, for things like music video work, the opposite is true. Also, I’d really recommend avoiding music that you don’t own the rights to use; it will save you headaches down the road and force you to be creative with your audio choices.
I recommend that you do your sound work wearing a decent pair of headphones – unless you have a very controlled environment, external speakers won’t give you a sense of what things sound like. However, once you have things mixed, take a listen without headphones, to make sure things still sound good. Every set of speakers and headphones sounds slightly different, so you may have to listen a few times and make adjustments – but you should always start with headphones.
Project 3: Sculpting Sound
For this week’s project, I’d like you to add sound to an existing piece of footage. Below are links to five different pieces with no audio. Download one of them and give it a soundtrack. This should be comprised of at least three different kinds of audio; for example, you might include music, ambience/room tone, voice over, and sound effects.


For audio content, there are a few places you can draw from. I’ve used findsounds.com many times for random sound effects. Bucknell also hosts a very impressive library of sound effects, which can be accessed using the following steps:
- Connect to the “Projects” server on netspace (smb://netspace.bucknell.edu/projects)
- Navigate to “TheatreSoundFx” folder
- Using the Finder (on a Mac), search the TheatreSoundFX folder for what sound you’d like to find
- Copy/Paste files you like into your media folder on your local computer or hard drive
If you’re looking for music, I’d suggest incompetech.com and the Free Music Archive. You can also find both music and sound effects in YouTube’s Audio Library.
I’ll be grading this project on a few factors: following the guidelines, using sound effectively and creatively, and avoiding peaking unpleasant cuts in or out..
After you’ve done your editing, export the finished piece using the H.264 format and the Vimeo 1080HD preset. Upload it to your Google Drive and send me the link to download it! As usual, get it to me by next Thursday morning, so that I can upload them to the course website. Have fun!


 If you have an audio clip that was recorded too low or too high, you can also make an automated adjustment called “normalizing.” Right-click on a clip and select “Audio Gain…” – this will bring up a small menu with a few different options. You can either normalize the “max peak” or “all peaks” – the two work in similar ways, so you probably won’t see a huge difference between the two. Keep in mind that since this is an automated effect, you’ll want to pay close attention to how it changes your clip. You can also set or adjust the gain of a clip in this menu, if the volume controls in the Effect Controls window are insufficient.