Categories
Blog Posts

Spheres and Cubes

3D SHAPES

As I previously mentioned, After Effects can be used to place 2D layers in 3D space, but it can’t be used for advanced 3D modeling.  We can, however, create or simulate simple 3D shapes such as cubes and spheres.

Cubes and Boxes

Making a 3D cube in After Effects is quite simple, although the process can be a bit tedious.  Construct your shape using solids – when you create a new solid, you can specify the size, so you can create a cube fairly quickly by creating six square solids (one for each side of the cube).  Switch the layers to 3D and adjust the orientation (or rotation) and position of each side so that they line up.  If, for example, you want to create a cube with sides that are 500 pixels, each side needs to be 500 pixels away from its opposite side.

You can make this process more streamlined by actually doing simple math within the timeline.  If your layer needs to move forward by 250 pixels, you can click on number you want to change and type “+250” after it.

Once you have your cube or box created, you may want to move it around your scene.  You can do this by parenting the sides to a 3D null object.  Create a null (from the top menu, Layer>New>Null Object) and turn on its 3D property in the timeline window.  Then parent each of the sides to the null object and use it to position your cube in 3D space.  You can play with the opacity and color of the sides and/or add virtual lights to give the shape some definition.
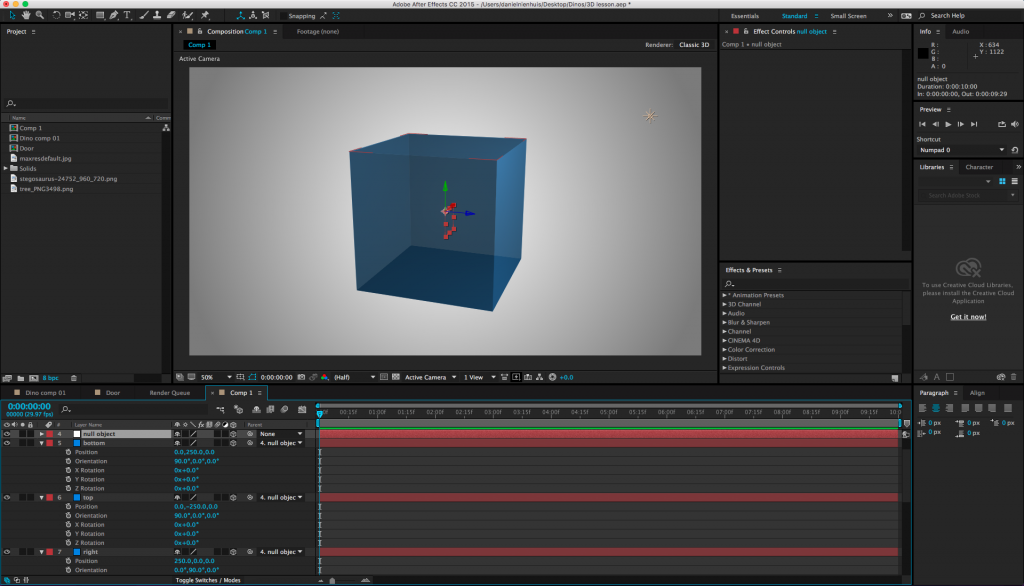
screen-shot-2016-11-10-at-2-12-10-pm

Spheres

We can’t create spheres in the same way that we create cubes, but we can create a shape that appears to be a sphere.  Using either a solid or an image (or even a video) as a base layer, choose “CC Sphere” from the “Perspective” category of the effects.  This effect will make any layer look like a sphere, complete with parameters to adjust the lighting and shading.  It will still be a flat 2D layer, though, so if you add a 3D camera move, your sphere will look like a disc instead.

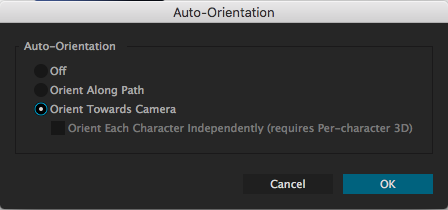
There is a way around this, though.  First, set the sphere layer to 3D.  Then right-click on the layer and choose Transform>Auto-Orient…, which will bring up a menu with a few options.  Choose “Orient Towards Camera” – this will make the layer face the active camera, regardless of where it is.  Since spheres look the same from every angle, your flat disc will appear to be 3D.
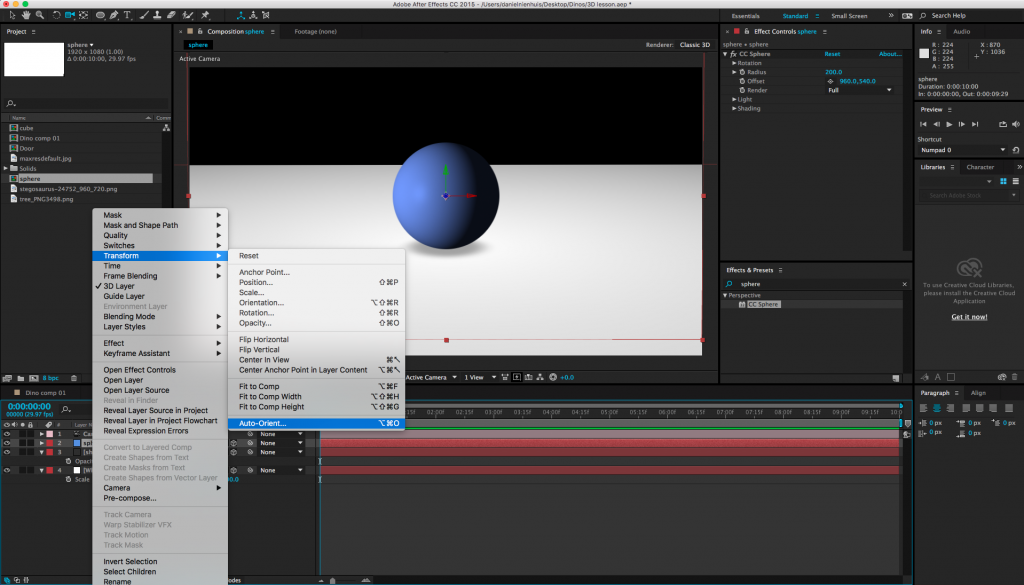
screen-shot-2016-11-10-at-2-24-55-pm

screen-shot-2016-11-10-at-2-25-10-pm

Remember that since your sphere is still technically a disc, virtual lights won’t affect it the way you might want them to.  However, you can fake many of the same effects (shadows, reflections, etc.).  For example, you can create a simple feathered shape to give the appearance of a shadow.

You can take this technique much further to create glowing orbs or planets or other complex spherical shapes.  If you want to really get crazy, check out this tutorial on Video Copilot.  Some things may be unfamiliar, but you should be able to follow along.  There are tons of  other great tutorials on Video Copilot as well, so check that site out if you want to hone your skills.
Categories
Blog Posts

What Makes Animation Amazing?

INSIGHT FROM BRAD BIRD

Here’s a great video essay on animation featuring one of its contemporary masters, Brad Bird.

Categories
Blog Posts

Round-Tripping Between Premiere and After Effects

PREMIERE AND AFTER EFFECTS INTEGRATION

One really nice feature of the Adobe suite of programs is how integrated everything is.  Earlier in the semester, we discussed how to send audio from Premiere to Audition to do repair work.  Premiere can send media to After Effects as well – and vice versa.

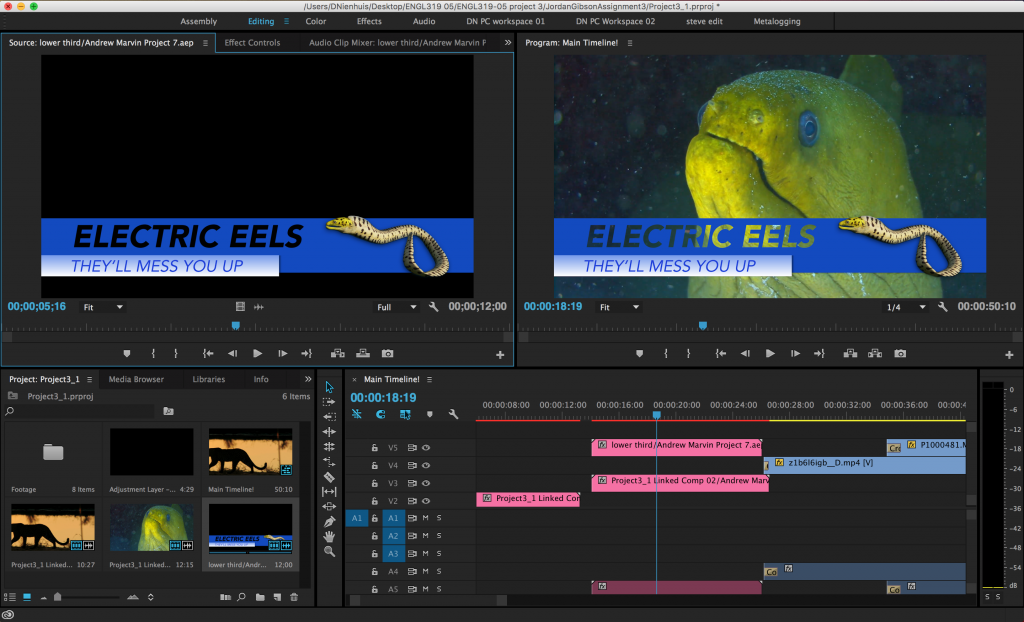
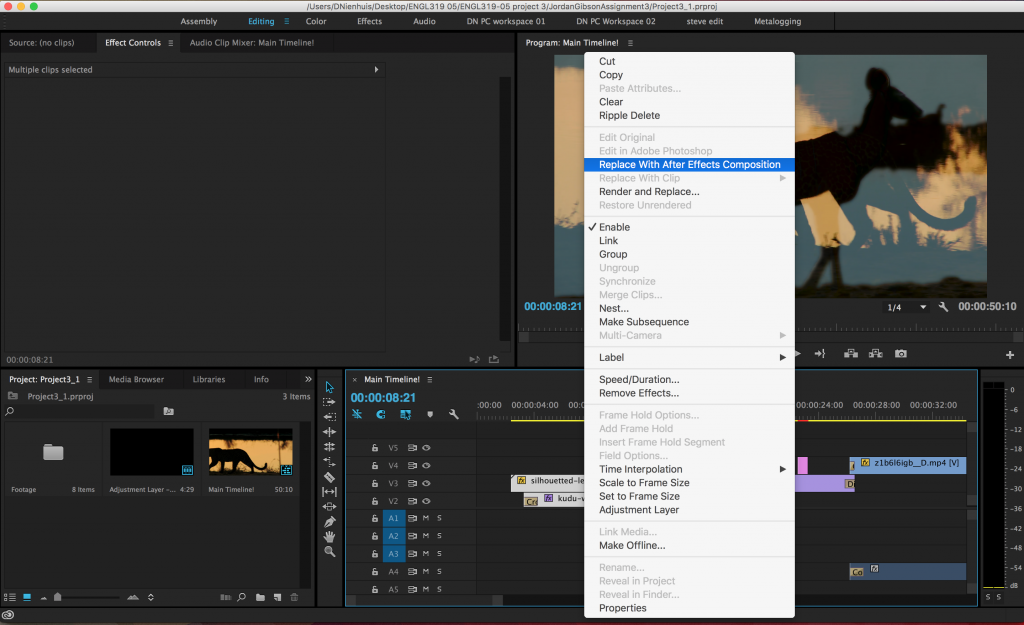
The process is actually incredibly simple.  To ensure that everything works well, open up both programs (remember to save in After Effects).  In Premiere, highlight the clips you would like to send to After Effects in the timeline panel.  Right-click and you should see an option that says “Replace With After Effects composition.”  When you choose this option, the highlighted media will be replaced with a single clip in the sequence.

screen-shot-2016-04-12-at-11-47-13-am-1024x625

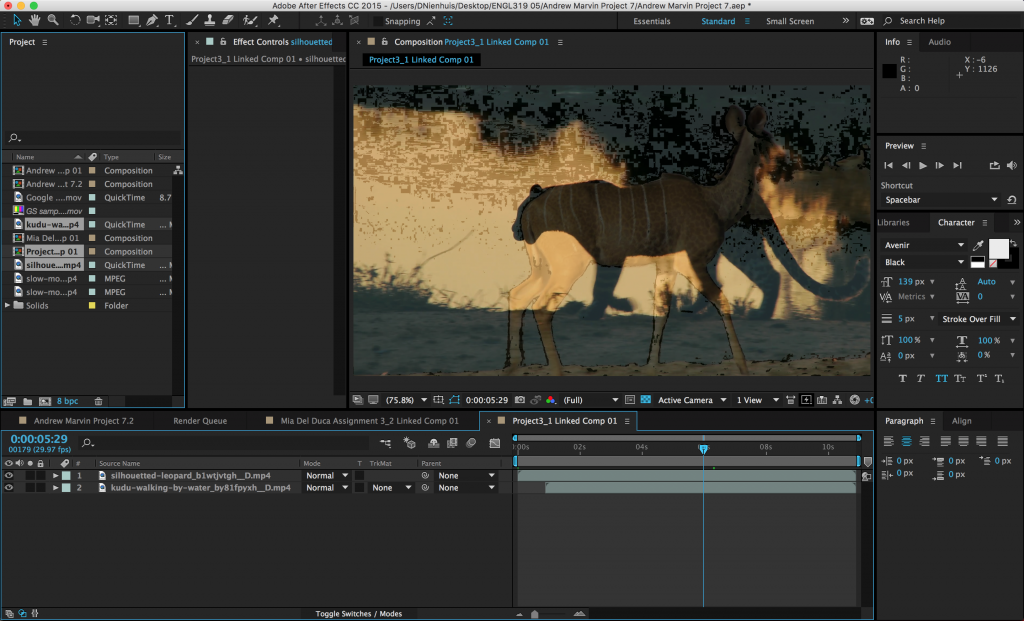
After Effects should open automatically with the selected clips in a new composition (the composition name will end with “Linked Comp”).  Even though Premiere and After Effects use different kinds of timelines, the programs do a good job of approximating between the two.  If you’ve made adjustments to the clips in Premiere before sending them to After Effects, many of those changes will carry over – things like scale, opacity, and position, as well as some effects.  However, things that don’t work the same in both programs – like transitions – will not carry over.

With the media in After Effects, you can manipulate the footage, edit, add text, and animate just as you would for any normal project.  As you make changes, the linked composition in Premiere will be affected – there is no need to render or send the footage back.  Keep in mind that this process will likely slow down your preview and rendering speeds in Premiere, unless you’re using a very fast computer.  When you’re done making changes, you can export the sequence from Premiere as usual.

screen-shot-2016-04-12-at-11-47-47-am-1024x621

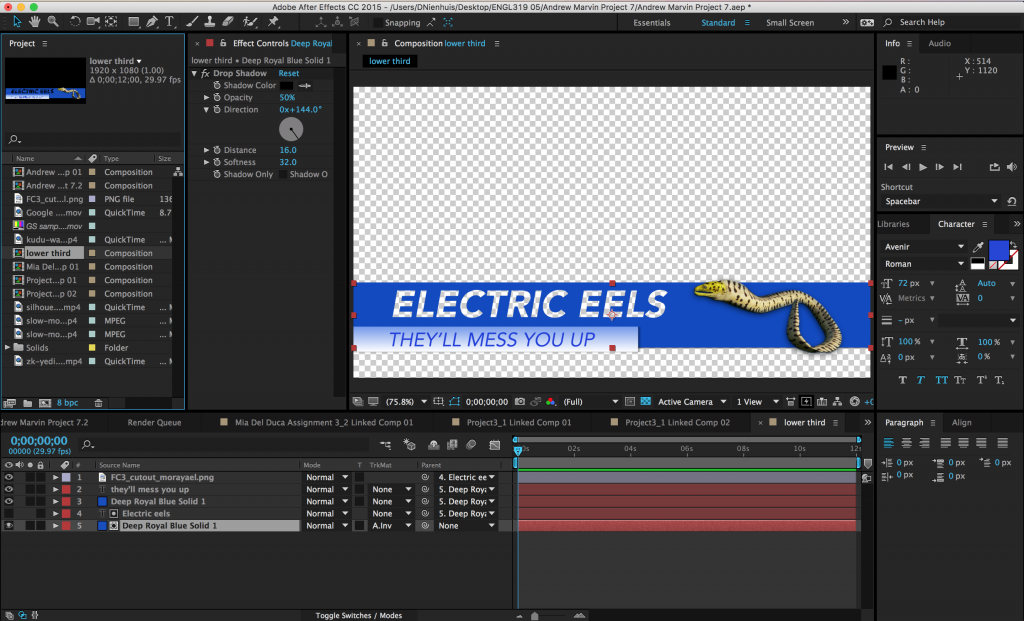
It’s also quite easy to send compositions originating in After Effects to timeline sequences in Premiere.  This is very useful for things like titles and lower thirds.  Create a composition in After Effects as you normally would.  Then simply drag the composition from the list of project media in After Effects to the list of project media in Premiere (you may need to shuffle your program windows around a little to do this).  The composition will appear alongside the rest of your media in Premiere and you will be able to add it to sequences in the timeline panel.  Again, any changes that you make in After Effects will affect the composition in Premiere.

screen-shot-2016-04-12-at-12-22-59-pm-1024x621

screen-shot-2016-04-12-at-12-23-25-pm-1024x622

Rendering an Alpha Channel in After Effects

While the live integration between After Effects and Premiere is very useful, sometimes the most efficient course is to work in the two programs individually – creating graphics in After Effects, exporting them as movie files, and importing them into Premiere.  When you do this, you may need to render video with transparent areas (in a lower third, for example).  The transparent part of a video file is called its alpha channel.

Because they are compressed, most video formats do not include an alpha channel.  If you create a lower third graphic in After Effects and export it using the H.264 compression we’ve been using thus far, the resulting video will be black in the transparent areas.

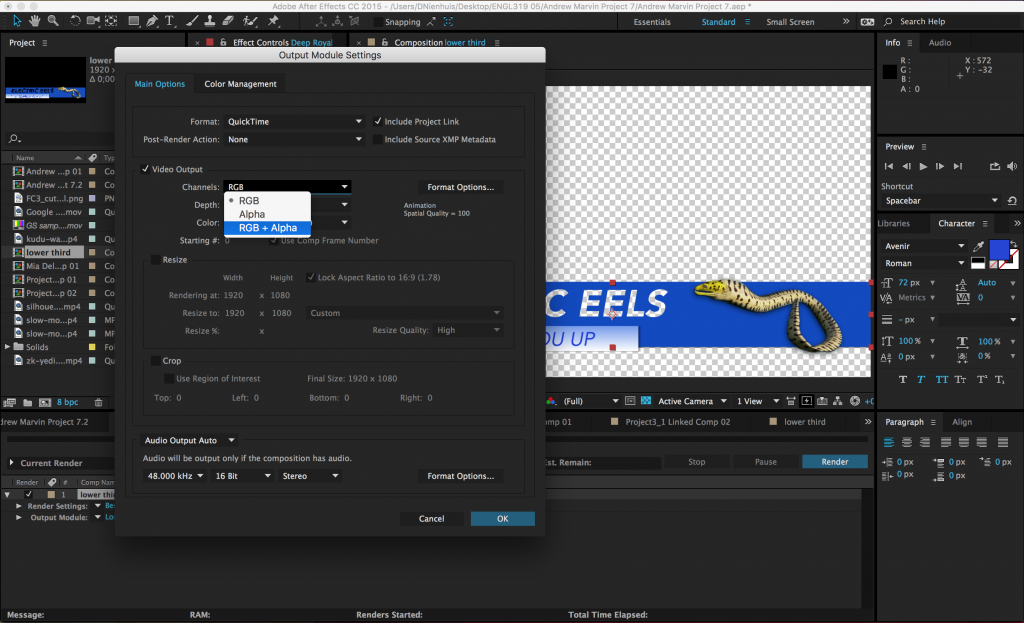
To render video with an alpha channel, send it to the After Effects render queue as usual.  Under the “Output Module,” choose the “Animation” codec instead of H.264.  In the output module settings window, there is a “Channels” drop-down menu under the “Video Output” section.  Certain video codecs (such as Animation) will allow you to choose RGB + Alpha in this menu.  RGB + Alpha will output a video with transparency data; RGB will output the video only, with a black background.

Because videos that use the Animation codec are less compressed and contain an additional channel of information, the resulting file sizes are much larger than they are for codecs like H.264.  For this reason, I only recommend using an alpha channel on exports where the clip is relatively short.

screen-shot-2016-04-12-at-12-43-37-pm-1024x623

Categories
Blog Posts

Spring 2017 Film/Media Studies Courses

COURSE LIST

Here are the F/MS courses meeting next semester.  There are some great options, so be sure to sign up as soon as you can.  Remember, this course can be repeated on different topics – next semester, this course is focused on animation.

Film/Media Studies Spring 2017

ENFS 130.01 Intro to Film/Media Studies MWF 9-9:52am, M 7-8:52pm Eisenstein

AHLG ARHC EGHU FRST W1

ENFS 130.02 Intro to Film/Media Studies MWF 10-10:52am, M 7-8:52pm Eisenstein

AHLG ARHC EGHU FRST W1

An introduction to the study of moving images on silver screen, television, tablet, and smart phone. Weekly screenings at the Campus Theater of films by everyone from Orson Welles to Andy Warhol will be complimented by critical readings and lots of class discussion.

ENFS 238.01 From Golden Age to Wasteland? MWF 11-11:52am, F 2-3:52pm Sewell

ARHC EGHU DUSC AHLG

This course examines how television became the dominant news and entertainment medium in the USA in the 1950s and 60s, with special attention paid to the representations of race, gender, and what it means to “be American.” A wide variety of television shows will be screened including dramas, sitcoms, and variety shows.

ENFS 245.01 Televisual Culture TR 9:30-10:52am, W 7-8:52pm Sewell

ARHC EGHU AHLG

Why and how do shows like Star Trek, Lost, and Breaking Bad inspire such passionate (or obsessive) fan followings? This course explores this subject in the context of wider debates about the role of audiences and

our media culture in general. Class screenings will include everything from Lost to Doctor Who.

ENFS 248.01/ Intermediality: Italy and Film MW 3-4:22pm, W 7-8:52pm Eisenstein

UNIV 248.01 CCIP

Italy has produced some of the greatest directors, actors, and films in Western cinema, and this IP course focuses on this tremendous cinematic achievement in the context of Italian culture in general.

ENFS 335.01 Audio-Vision: Intermediate Production M 2-4:52pm Meyers

ARHC

A course on sound design in both video and multimedia productions. It will be workshop based, and will stress acquiring practical skills through hands-on experience.

ENFS 337.01 Seminar in Film Theory TR 1-3:52pm Sewell

ARHC EGHU

An advanced seminar on classical and contemporary film theory in which students will learn the major aesthetic, political, and philosophical debates that have shaped how cinema is viewed and integrated in

culture in general.

ENFS 340.01 Film/Media Production Practicum W 3-4:22pm Nienhuis

ARHC

A production course that focuses on animation and the visual effects software suite After Effects. Learn how to create dynamic video content of your own through character animation, title design, motion graphics,

and much, much more.

Got questions? Email the program director Prof. John Hunter at jchunter@bucknell.edu

Categories
Blog Posts

Creating Animation in Real Time

THE FUTURE OF ANIMATION?

Earlier this year, The Simpsons used animation software from Adobe to incorporate a live segment into an episode.  During the segment, fans of the show called in and asked unscripted questions to Homer, who answered – while animated – in real-time.

This was done using a piece of still-in-development software called Adobe Character Animator.  Character Animator is included with current versions of After Effects, but launches as a standalone program.  It uses web-cam point tracking to map facial movements in real-time.  Mouth movements are translated to pre-built shapes, that change and move with the action of the actor.  Other gestures, such as blinking or body movements can either be tracked live or mapped to buttons.  When a button is pressed, the corresponding gesture is made.

For the segment on The Simpsons, Homer’s voice actor (Dan Castellaneta) responded to questions will being tracked by a camera monitoring his facial movements.  Other gestures were controlled by the episode director using a keyboard.

While the humor is a bit hit-or-miss, the technology and execution are certainly impressive.  However, the most interesting thing about this may be that the tools used to do so are readily available and accessible.  We have Character Animator installed on the computers in the Marts studio and anyone with a Creative Cloud subscription can download it.  This is a prime example of the specialized tools of video production and animation becoming increasingly democratized.

You can read more about the Simpsons live animation segment over at Cartoon Brew.  Since this is a specialized animation tool, we aren’t covering it in this class – but if you’re interested in learning how to use it, allow me to make a shameless plug for next semester’s Film/Media Studies Production Practicum, which will be focused on animation.  We’ll be using After Effects, Character Animator, Illustrator, Photoshop, and even more esoteric tools such as stop-motion.